Forecloud Technologies Pvt. Ltd. - Business Central Appointment Scheduling Automation
In this blog post, we’ll break down how you can automate customer appointment scheduling in Microsoft Dynamics 365 Business Central by generating and sending emails with ICS (iCalendar)
Introduction:
In this blog post, we’ll break down how you can automate customer appointment scheduling in Microsoft Dynamics 365 Business Central by generating and sending emails with ICS (iCalendar) file attachment
Pre-requisites:
Email Setup is required in business central
Email Account
Business Central Environment
Solution:
Key Features of the Solution
1. Table Extension to Add Appointment Fields
We will extend the standard Customer table to include two new fields: AppointmentDate and StartTime. These fields will store the appointment date and start time for each customer.
Code:
-------------------------------------------------------------------------------------------------------
tableextension 50100 CustomerExt extends Customer
{
fields
{
field(50101; AppointmentDate; Date)
{
Caption = 'Appointment Date';
}
field(50102; StartTime; Time)
{
Caption = 'Start Time';
InitValue = 090000T;
}
}
}
Explanation-
- AppointmentDate: A Date field to store the date of the appointment.
- StartTime: A Time field to store the start time of the appointment. The initial value is set to 9:00 AM (090000T).
2. Page Extension to Display Appointment Fields
Next, we will extend the Customer Card page to display the Appointment Date and Start Time fields. This allows users to see and edit appointment details directly on the customer card.
Code:
pageextension 50100 CustomerCardExt extends "Customer Card"
{
layout
{
addafter(General)
{
group(Appointment)
{
field(AppointmentDate; Rec.AppointmentDate)
{
Caption = 'Appointment Date';
ApplicationArea = All;
}
field(StartTime; Rec.StartTime)
{
Caption = 'Start Time';
ApplicationArea = All;
}
}
}
}
actions
{
addafter("F&unctions")
{
action("Schedule Appointment")
{
Image = "1099Form";
ApplicationArea = All;
Caption = 'Schedule Appointment';
trigger OnAction()
var
CuCustomerAppointments: Codeunit "Customer Appointments";
AppointmentDateTime: DateTime;
begin
Clear(AppointmentDateTime);
AppointmentDateTime := CreateDateTime(Rec.AppointmentDate, Rec.StartTime);
if ((AppointmentDateTime >= CurrentDateTime)) then begin
CuCustomerAppointments.CreateAndSend(Rec);
end;
if (AppointmentDateTime < CurrentDateTime) then begin
Error('Appointments should be set for the upcoming date and time.');
end;
end;
}
}
}
}
Explanation-
- The Appointment group is added after the General group in the customer card layout. This group contains two fields: Appointment Date and Start Time.
- The "Schedule Appointment" action is added under the Functions group. When the user clicks on this action, the CreateAndSend procedure from the Customer Appointments codeunit is called.
- The OnAction trigger checks if the scheduled appointment time is in the future. If the appointment time is valid, the system sends the appointment email. If the appointment time is in the past, an error message is shown, preventing the user from scheduling past appointments.
3. Codeunit for Appointment Email Creation and Sending
3.1 Automated Email Creation and Sending
- Procedure: CreateAndSend(RecCustomer: Record "Customer")
- This procedure is responsible for sending an appointment email to the customer.
- It checks if the customer’s email address is available, then creates the email with the appropriate ICS file attachment.
- The email is sent using the Send method with the default email scenario.
Code:
var
ProdIDTxt: Label '//Microsoft Corporation//Outlook 16.0 MIMEDIR//EN';
DateTimeFormatTxt: Label '<Year4><Month,2><Day,2>T<Hours24,2><Minutes,2><Seconds,2>', Locked = true;
procedure CreateAndSend(RecCustomer: Record "Customer")
var
TempEmailItem: Record "Email Item" temporary;
begin
if CreateRequest(TempEmailItem, RecCustomer) then begin
TempEmailItem.Send(true, Enum::"Email Scenario"::Default);
end;
end;
Explanation-
- The procedure first verifies the customer’s email address and if present, proceeds to create the request.
- The email is sent once the ICS attachment is successfully generated
3.2. Email Request Creation
- Procedure: CreateRequest(var TempEmailItem: Record "Email Item" temporary; RecCustomer: Record "Customer"): Boolean
- This function verifies whether the customer’s email is present. If the email is available, it generates the email request.
- If the customer has no email, it raises an error message.
Code:
procedure CreateRequest(var TempEmailItem: Record "Email Item" temporary; RecCustomer: Record "Customer"): Boolean
var
Email: Text;
begin
Email := RecCustomer."E-Mail";
if Email <> '' then begin
GenerateEmail(TempEmailItem, Email, RecCustomer);
exit(true);
end
else begin
Error('Please provide email to schedule appointment');
end;
end;
3.3. ICS File Generation (Calendar Invitation)
- Procedure: GenerateICS(RecCustomer: Record "Customer") ICS: Text
- This is the core procedure that generates the actual .ics calendar invitation file.
- The ICS format is a standard used by calendar applications (like Outlook and Google Calendar) to represent events.
- The procedure constructs the ICS file based on customer details like name, appointment date, location, and description.
- Key Data Included in ICS:
- Summary: The appointment subject, which includes customer details.
- Start/End Time: The start and end dates/times for the appointment, formatted in the correct way.
- Location: Customer’s address and city, integrated into the ICS file.
- Description: A personalized description of the appointment, which can include custom data.
Code:
local procedure GenerateICS(RecCustomer: Record "Customer") ICS: Text
var
TextBuilder: TextBuilder;
Location: Text;
Summary: Text;
Status: Text;
Method: Text;
Description: Text;
Organizer: Text;
Filename: Text;
AttachmentInfo: Dictionary of [Integer, Text];
Id: Integer;
Base64: Text;
begin
Summary := StrSubstNo('%1 : %2', RecCustomer."No.", RecCustomer.Name);
Method := 'REQUEST';
Status := 'BUSY';
Organizer := GetOrganizer();
Description := GetDescription(RecCustomer);
TextBuilder.AppendLine('BEGIN:VCALENDAR');
TextBuilder.AppendLine('PRODID:-' + ProdIDTxt);
TextBuilder.AppendLine('VERSION:2.0');
TextBuilder.AppendLine('METHOD:' + Method);
TextBuilder.AppendLine('X-MS-OLK-FORCEINSPECTOROPEN:TRUE');
TextBuilder.AppendLine('BEGIN:VEVENT');
TextBuilder.AppendLine('CLASS:PUBLIC');
TextBuilder.AppendLine('UID:' + DelChr(CreateGuid(), '<>', '{}'));
TextBuilder.AppendLine('ORGANIZER:MAILTO:' + Organizer);
TextBuilder.AppendLine('LOCATION:' + RecCustomer.Address + RecCustomer.City + RecCustomer."Country/Region Code");
TextBuilder.AppendLine('DTSTART:' + GetStartDate(RecCustomer));
TextBuilder.AppendLine('DTEND:' + GetEndDate(RecCustomer));
TextBuilder.AppendLine('PRIORITY:5');
TextBuilder.AppendLine('SEQUENCE:0');
TextBuilder.AppendLine('SUMMARY:' + Summary);
TextBuilder.AppendLine('TRANSP:OPAQUE');
TextBuilder.AppendLine('DESCRIPTION:' + Description);
TextBuilder.AppendLine('X-ALT-DESC;FMTTYPE=' + GetHtmlDescription(Description));
TextBuilder.AppendLine('X-MICROSOFT-CDO-BUSYSTATUS:BUSY');
TextBuilder.AppendLine('X-MICROSOFT-CDO-IMPORTANCE:1');
TextBuilder.AppendLine('X-MICROSOFT-CDO-INTENDEDSTATUS:BUSY');
TextBuilder.AppendLine('X-MICROSOFT-DISALLOW-COUNTER:TRUE');
TextBuilder.AppendLine('X-MS-OLK-CONFTYPE:0');
TextBuilder.AppendLine('STATUS:' + Status);
TextBuilder.AppendLine('BEGIN:VALARM');
TextBuilder.AppendLine('TRIGGER:-PT15M');
TextBuilder.AppendLine('ACTION:DISPLAY');
TextBuilder.AppendLine('DESCRIPTION:Reminder');
TextBuilder.AppendLine('END:VALARM');
TextBuilder.AppendLine('END:VEVENT');
TextBuilder.AppendLine('END:VCALENDAR');
ICS := TextBuilder.ToText();
end;
Explanation-
- TextBuilder is used to dynamically create the content of the ICS file. This allows for flexibility, including various fields such as the event’s summary, start/end times, and description.
3.4. ICS Attachment and Email Generation
- Procedure: GenerateEmail(var TempEmailItem: Record "Email Item" temporary; RecipientEmail: Text; RecCustomer: Record "Customer")
- This procedure generates the email, attaches the .ics file, and prepares it for sending.
- The ICS content is written to a temporary stream using the TempBlob codeunit.
- The email’s subject, body, and recipient are set dynamically based on the customer’s information.
Code:
-------------------------------------------------------------------------------------------------------
local procedure GenerateEmail(var TempEmailItem: Record "Email Item" temporary; RecipientEmail: Text; RecCustomer: Record "Customer")
var
TempBlob: Codeunit "Temp Blob";
Stream: OutStream;
InStream: Instream;
ICS, Filename : Text;
MaxSize: Integer;
begin
Clear(Filename);
Clear(ICS);
MaxSize := 10485760;
ICS := GenerateICS(RecCustomer);
if StrLen(ICS) > MaxSize then
Error('The ICS file exceeds the maximum size limit of 10MB.')
else begin
TempBlob.CreateOutStream(Stream, TextEncoding::UTF8);
Stream.Write(ICS);
TempBlob.CreateInStream(InStream);
TempEmailItem.Initialize();
if RecCustomer.Name <> '' then begin
Filename := RecCustomer.Name;
TempEmailItem.Subject := StrSubstNo('Appointment - %1 %2', RecCustomer."No.", RecCustomer.Name);
end
else begin
Filename := RecCustomer."No.";
TempEmailItem.Subject := StrSubstNo('Appointment - %1', RecCustomer."No.");
end;
TempEmailItem.AddAttachment(InStream, StrSubstNo('%1.ics', Filename));
TempEmailItem."Send to" := RecipientEmail;
end;
end;
Explanation-
- Attachment Handling: The .ics file is added as an attachment using the AddAttachment method.
- Subject: The subject is dynamically generated based on the customer's details.
3.5. Date and Time Handling
- Get Start and End Date/Time:
- Procedure: GetStartDate(RecCustomer: Record "Customer") StartDateTime: Text and GetEndDate(RecCustomer: Record "Customer") EndDateTime: Text
- These procedures convert the customer's AppointmentDate and StartTime into a formatted string for the ICS file.
- The end time is calculated based on a fixed duration of 8 hours (can be adjusted as needed).
Code (Start Date Example):
procedure GetStartDate(RecCustomer: Record "Customer") StartDateTime: Text
var
StartDate: DateTime;
StartTime: Time;
begin
StartDate := CreateDateTime(RecCustomer.AppointmentDate, RecCustomer.StartTime);
Evaluate(StartTime, Format(8));
StartDateTime := Format(StartDate, 0, DateTimeFormatTxt);
end;
procedure GetEndDate(RecCustomer: Record "Customer") EndDateTime: Text
var
EndDate: DateTime;
StartTime: Time;
Duration: Integer;
begin
EndDate := CreateDateTime(RecCustomer.AppointmentDate, RecCustomer.StartTime);
Evaluate(StartTime, Format(8));
Duration := 8 * 3600000;
EndDateTime := Format((EndDate + Duration), 0, DateTimeFormatTxt);
end;
3.7. Organizer Email Retrieval
- Procedure: GetOrganizer() Text
- This procedure retrieves the organizer’s email address for the appointment. It first checks the User record for a valid email and then falls back to a default email address if none is found.
Code-
local procedure GetOrganizer(): Text
var
ProjectManagerUser: Record User;
EmailAccount: Record "Email Account";
EmailScenario: Codeunit "Email Scenario";
begin
ProjectManagerUser.SetRange("User Name", UserId());
ProjectManagerUser.SetFilter("Authentication Email", '<>%1', '');
if ProjectManagerUser.FindFirst() then
exit(ProjectManagerUser."Authentication Email");
EmailScenario.GetEmailAccount(Enum::"Email Scenario"::Default, EmailAccount);
exit(EmailAccount."Email Address");
end;
3.8. Generating HTML Description for ICS File
- Procedure: GetHtmlDescription(Description: Text) HtmlAppointDescription: Text
- This procedure is responsible for generating an HTML-formatted description for the ICS file.
- It uses a Regex codeunit to replace newline characters (\n) and carriage returns (\r) with appropriate HTML tags (<br>). This ensures the appointment description is properly formatted when viewed in calendar applications that support HTML content.
- The GetHtmlDescription procedure takes the plain-text description of the appointment and transforms it into an HTML-compatible format.
- It removes unnecessary carriage returns and converts
Code-
local procedure GetHtmlDescription(Description: Text) HtmlAppointDescription: Text
var
Regex: Codeunit Regex;
begin
HtmlAppointDescription := Regex.Replace(Description, '\\r', '');
HtmlAppointDescription := Regex.Replace(HtmlAppointDescription, '\\n', '<br>');
HtmlAppointDescription := 'text/html:<html><body>' + HtmlAppointDescription + '</html></body>';
end;
Functional Details
1. Open the Customer Card and enter the relevant details.
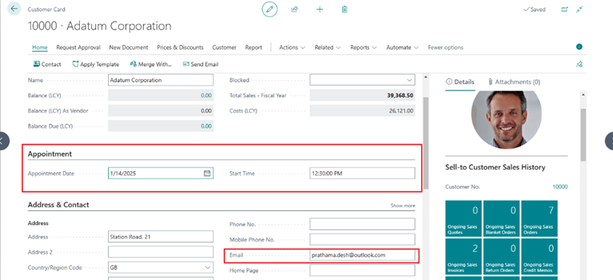
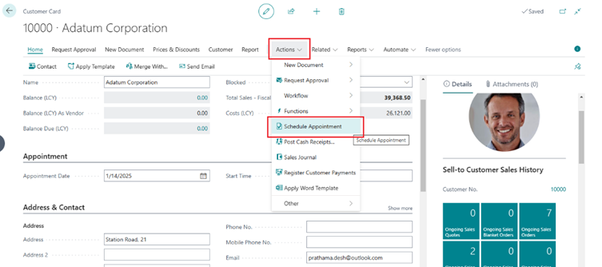
2. Navigate to the Actions menu and click on "Schedule Appointment."
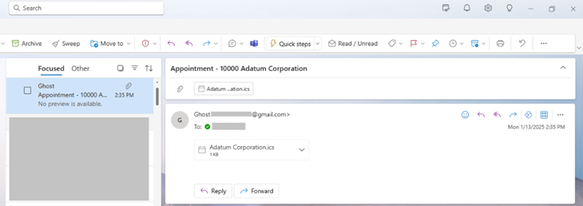
3. Check the Outlook inbox for the appointment email.
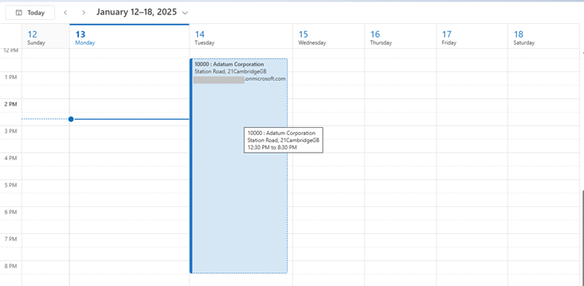
4. Add the appointment to your calendar.

5. The appointment will now be scheduled in your calendar.
Conclusion
This AL code demonstrates how to automate customer appointment invitations in Business Central. By leveraging .ics files and email integration, businesses can streamline scheduling and improve communication with customers. If you're looking to enhance your system with similar functionality, this approach provides a solid foundation.
Feel free to adapt the code to meet your specific requirements!
No comments yet. Login to start a new discussion Start a new discussion